
By now, you should already have your new WordPress powered website up and running. Obviously there are still some things you should do, to ensure that your new WordPress website is in good working order. Following below are some extra tips that you should do after installing and successfully importing your blogger blog to WordPress. In case you missed the first and second part of this tutorial, please check out the links below:
How To Migrate From Blogger To WordPress: Part 1/3
How To Migrate From Blogger To WordPress: Part 2/3
How To Redirect Your WordPress Feed To Feedburner?
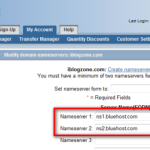
Your original WordPress feed URL differs from that of feedburner and it normally looks like this, http://www.yourdomain.com/feed. Whether you are creating a new feed or redirecting to your existing feedburner account, you will have to change the “original” source of your feed on your feedburner’s dashboard. To achieve this, log in to your feedburner account and select or create your feed.

To redirect your feeds, you can install the FeedSmith plugin (Google recommended) or Blogger Redirector which will handle all the work for you or you can manually redirect your feeds by following the instructions provided on WordPress.org. Also, there many themes that already come with this feature included. All you need is to add your feedburner URL and you are good to go.
Let Search Engines Find Your Blog and Other Redirections.
Do not delete your blogger blog, instead turn on WordPress and turn off blogger’s feature for search engines to find you. This will avoid Google from considering your blogs as duplicate content. On WordPress, go to Settings > Privacy and select“ I would like my blog to be visible to everyone”. On blogger, go to settings > basic > and set the “let search engines find your blog” to NO.
 In addition to the above and if you want to have an added security that all your redirections are OK, install Blogger Redirector, activate it and you’re done. Please note that this is a plugin, and installing too much plugins can hamper your website’s loading time. Now that site speed is a SEO ranking factor, you might want to choose another method, like editing your .htaccess file and placing some codes. Do this with caution. If you are not familiar with coding, I suggest you install the plugin and manage them wisely to avoid your website being too “heavy”. Here is a simple way to manually edit your .htaccess file should you wish to go this route.
Redirect 404 Errors With Permalink Finder
While this is not a must, I believe that it is worthwhile to install this plugin. The Permalink Finder Plugin detects when WordPress cannot find a permalink. Before it generates the 404 error it will try to locate any posts with similar words, by searching through the database trying to find any of the word values from the bad link. It takes the best match and rather than issuing a 404 error it sends back a redirect to a correct page. This is particularly useful when you convert your Blogger blog to WordPress. I tried it and it works. For example, I do not have any permalink that reads like this, https://www.iblogzone.com/seo. If you type this is in your address bar, it will take you to the nearest post that I have that contains the keyword SEO. Cool!
Finalizing Your Blogger To WordPress Migration
I have tried to make this tutorial as easy to understand as possible. Obviously, there could many other ways or steps to perform this transition. However, this is what I have done and it (hopefully) works. Please bear in mind that this is the “newbie” way of doing things and not for the tech savvy. Many thanks to the wonderful people who made this transition smooth for me and I suggest that you take a peek on these awesome post’s to further enhance your WordPress experience.
5 Foundational Plugins, Critical Infrastructure for Your New WordPress Blog
HowTo: Move From Blogger to WordPress
43 Blogger Tips – What you should do after installing WordPress
If you have made your transition through this tutorial, please share your experience with us. I will also love to hear suggestions so I may improve this tutorial as needed.
Related Posts
 How To Migrate From Blogger To WordPress: Part 2/3
 Ways to Gain Influence through Blogging
 The Hottest Design Features from Magazines that Stopped the Presses.
 7 Ways To Kill Your Blog
 Are You Maximizing Guest Posting Initiatives? Why Posting on Low Readership and PR Blogs Is Important!
 Top 5 Mistakes That Will Prove To Be A Hindrance In Your Blogging Success
 Traffic Generation and the Survival of the Dodo bird!
 Reality vs. Imagination in the World of Blogging
Comments are closed.