
[note]This post has been updated on August 2011, to accommodate for the new version of the new blogger or Google Blogs. With the exception of the interface, everything else still apllies.[/note]Now that you have made your plan, let us see what you should have done by now in order to make this transition from Blogger to WordPress (part 1), as smooth as possible.
What You Need To Convert Blogger To WordPress
1) Decision: You have decided that this is what you want to do.
2) Domain Name: You either have an existing domain name, you have already registered your domain name with any registrar, or you have decided to use a web hosting partner that offers you a free domain name.
3) Web Hosting: You either have an existing web hosting plan, or you are going to get one while reading this tutorial. Either way you should have by now decided which one you will use. You are leaving blogger.com, right?
All other points in your plan will be used later. For now we will focus on the “move” itself and not worry about themes, plugins, redirecting or creating a feedburner account, and anything else. We will concentrate on “importing” all of your posts and comments to WP, and fix all the permalinks to ensure that you do not loose any links and images, thus keeping any statistics you may have, including that all important rankings on search engines. Off we go..
For the purpose of this tutorial, I will be using the “goods” described below. It should work regardless of any domain registrar and web hosting you have chosen.
Blogger.com: This is the obvious part.
DirectNic.com: Where I registered my domain (iblogzone has been registered a long time ago so I did not need to create a new one. They are very reliable and have a good client support, but a little too expensive, so you might want to skip this one.
BlueHost: My choice for hosting my blog and since they provide you with one free domain, I just took the advantage and created another one to keep it handy:)
WordPress Software: Installed with either Fantastico or SimpleScripts
Step 1. Pointing Your Domain To Your Web host
You may skip this step if you have decided to use the offer of Bluehost, as it is done upon registration. If however you have your domain registered somewhere else, you will have to set your nameservers to point towards your selected web hosting company. Follow the instructions of your web host on how to add a new domain and obtain the nameservers. On BlueHost this process is done by selecting on your cPanel the Addon Domain Manager. See example below on how I pointed my custom domain to my web host:

The Panic Zone: If you are using the option of directing your domain to your webhost’s nameservers, remember that it may take 24 – 48 hours before it propagates over the internet. During this time, you may see some weird things going on, like being redirected to your registrar, or get a “page not found” error, or if you are using the Alexa toolbar, a recovery page. This is all normal and there is no need to panic.
While you are waiting for the propagation or if you just created your brand new domain, then off to step 2.
Step 2: Install WordPress.
The majority of web hosting services provide on your cPanel an autoinstaller script like Fantastico or SimpleScripts. Just click on any of those and follow the instructions, they are really easy. If you need to do a manual installation, head over to WordPress.org for instructions on how to install WP manually. After the installation, you should be provided with a a user name (usually admin) and a temporary password. Your admin dashboard should now read www.yourdomain.com/wp-admin.
 Note: You should not be able to log in your WP admin if the propagation is still not finished. Occasionally, a blip could happen and you can get in. If it disappears or you are unable to log in your WP admin, wait for the full propagation to occur.
Step 3: Import all your post, images, and comments.
Now pay attention to this part to make sure it is done properly. First, backup your blogger blog. This is done by going to the settings tab and selecting export blog. This is just to play it safe. Then do the following in this order.
Old Google Blogs Interface

New Google Blogs Interface – goto settings > other > export blog

1) If you are using blogger’s custom domain feature, you have to reset your blog’s URL back to the xxx.blogspot.com. You will not be able to import anything if it is set to the custom domain (VERY IMPORTANT).
Old Google Blogs Interface

New Google Blogs Interface – goto setting > basic > edit blog address

2) Log in to your WordPress admin and under tools, select import. You will see the various systems that you are allowed to import from. Select Blogger and you will be asked to grant access to your blogger account. When the authorization is completed, it will take you back to WP and all your blogs will be visible. See below:
 Hit the magic button and let the WP engine do the job for you. After the process is done, you should see all your post and comments. NOTE: If you are using a commenting system other than blogger’s default, there is a chance that you will loose comments along the way. I lost many due to a synchronization problem with my chosen commenting system. You have been warned.
 Step 4: Fixing the all important blogger permalinks.
I’m not going into too much detail on the differences between blogger and WP URLs. Just be aware that the URL structure of blogger.com is different to that of WP. In order to keep your permalinks intact, and with this all your search engine rankings, backlinks, images, etc., you will have to do some fixing.
1) In your WP dashboard. Select settings and then permalinks. Select custom structure and paste this structure exactly as it is: /%year%/%monthnum%/%postname%.html – This will enable WP to use the same structure as blogger.com.
 2) Now it is time to fix those permalinks. While you can do this manually, it can be time consuming and it is possible that you can make some errors during the process. Maintain Blogger Permalinks is a WP plugin that makes this work all look like a walk in the park. Read carefully the instructions, install the plugin, run it and in a matter of seconds, all your links are fixed. Cool!
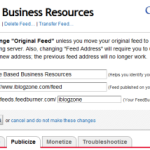
Step 5. Redirecting your blogger blog to WP.
Go back to your blogger blog and set the custom domain feature. Just select settings, publishing and custom domain button. Enter your URL, save and you are done. (New Google Blog Interface is the same as above).

 That’s it. You are now set, and ready to enjoy WordPress. Part 3/3 will conclude this tutorial and will include other steps such as setting up your RSS, installing new themes and some other important “to do’s” that you should not miss. If you feel that I have missed something, please let me know.
SOURCE: It is obvious that I have not learned to do all of these things on my own, so I would like to share my main source of information that made this transition possible. Jaypee and Gem (The Lady Programmer) also provides an awesome tutorial on how to this migration. Please feel free to read their tutorial as well as you may find it easier to understand than what I have written above :).
UPDATE: Now for the final part of How To Migrate From Blogger To WordPress 3/3
Related Posts
 How To Migrate From Blogger To WordPress: Part 3/3
 Ways to Gain Influence through Blogging
 The Hottest Design Features from Magazines that Stopped the Presses.
 7 Ways To Kill Your Blog
 Are You Maximizing Guest Posting Initiatives? Why Posting on Low Readership and PR Blogs Is Important!
 Top 5 Mistakes That Will Prove To Be A Hindrance In Your Blogging Success
 Traffic Generation and the Survival of the Dodo bird!
 Reality vs. Imagination in the World of Blogging
Comments are closed.